Ecommerce tracking:
How to Track Successful Orders to excentos Analytics
The Ecommerce tracking is part of the excentos' Web Analytics and allows tracking orders of products that have been recommended by the Product Guide. Ecommerce tracking is offered by excentos free of charge and we recommend activating it in order to measure and improve your Product Guide's long term success.
This documentation describes how orders in your shop are generated and how excentos gets informed about successful orders (successNotifier).
Goal of Ecommerce tracking
The standard event tracking only recognizes user actions that take place within the Product Guide. Because transactions often take place outside of excentos Product Guides (i.e. in your product detail or order confirmation page) and some consumers tend to purchase later, also sometimes in another visit, we cannot track transactions without our Ecommerce tracking script.
How do we track recommended products?
excentos saves the recommended products for each visitor automatically when they are displayed on his device.
The information is kept anonymously in a serverside database.
Each entry contains the following data:
- visitor ID
- Product Guide name
- system or market
- list of product IDs rendered by the client (i.e. displayed in the web browser's viewport upon active user request / scrolling to make the recommendation visible)
- date
How does excentos get informed about successful orders (successNotifier)?
Once your visitor completed a checkout, your shop system presents an order confirmation page. For each visitor in your order confirmation page, the successNotifier code checks if the visitor used the Product Guide by examining the xcVisitorId cookie. Only if the xcVisitorId cookie exists, tracking data regarding this order is sent to excentos. excentos then determines for each purchased product whether it was presented in the Product Guide or not. Only purchased products that were presented to the visitor in a Product Guide will then be stored. The information is kept anonymously in a serverside database.
Depending on your project configuration and contract type, this information contains the following data:
- visitor ID
- order ID
- product ID and, if applicable, master product ID (in order to determine if a user bought a variant of a product recommended by excentos)
- product label
- product category
- system or market
- date
- price
- currency
Notes and Prerequisites
Whether Ecommerce tracking is available or not depends on the Workbench edition you choose. All efforts for setup, support, testing and ongoing quality assurance will be invoiced according to a support package or time and material.
Prerequisites
- publish the Product Guide you have created in the Workbench (see
documentation
).
The Product Guide needs to contain some example products and should contain outlinks to product detail pages within your website - integrate the Product Guides into an integration page within your website.
See the site integration documentation. - provide a test shopping cart functionality:
- The test shopping cart functionality can be any shopping cart functionality on a productive or stage environment that contains the below script code and allows excentos to complete orders without actually ordering the product.
- After you have integrated the tracking code into your order confirmation page, excentos may choose to only activate the reports in our web analytics system once you provide a test shopping cart functionality that allows us to test purchasing products. We need the test shopping cart in order to test the accuracy of the data, effectively handle your support requests and make sure this very important functionality works as intended.
- Please notify excentos if you would like to use the Ecommerce tracking but cannot provide a test shopping cart.
- How to Integrate Ecommerce Tracking
- Diagram
- FAQ and further information
- How to test the ecommerce tracking
-
How to integrate Ecommerce Tracking
In order to activate the Ecommerce Tracking, you have to implement and integrate the successNotifier code snippet into the order confirmation page of your shop, which tracks the above mentioned information. First, you need to write JavaScript or template code which accesses the checkout object of your shop system and provides the required product and order information. Next call the ExcentosSuccessNotifier() function with the data. Basically, the resulting code should do the following:
- Get the list of ordered products from the user's checkout depending on your shop system.
- Loop over the list of products and call the ExcentosSuccessNotifier() function with parameter "checkout" for each product.
- Make sure to insert all parameters in each call. Insert an empty string if a value is not present (e.g. the variant master ID) and 0 for price and quantity if not applicable.
- Use the English number format for the price (i.e. dot such as '.' as decimal separator, e.g. 39.99 instead of 39,99
- Get the order ID for the user's checkout depending on your shop system.
- Call the ExcentosSuccessNotifier() function with parameter "track" and the order ID
You will find a schematic implementation and some concrete examples below.
Schematic Implementation
Please replace the term projectName with your Workbench account name. Furthermore, substitute the lines starting with //>>>> containing pseudo-code with your own implementation for your shop system.
  1 |  <script>
  2 |       (function(E,x,c,e,n,t,o,s){o="ExcentosSuccessNotifier";E[o]=E[o]||function(){(E[o].q=E[o].q||[]).push(arguments)};
  3 |       n=x.createElement(c);t=x.getElementsByTagName(c)[0];n.async=1;n.src=e;t.parentNode.insertBefore(n,t);})
  4 |       (window,document,"script","//service.excentos.com/projectName/DE/ajaxclient/xcProject/ExcentosSuccessNotifier.js");
  5 |       // example service-URL: "//service.excentos.com/bikeshop/DE/ajaxclient/xcProject/ExcentosSuccessNotifier.js"
  6 |
  7 |       // Send each item from shop checkout to the ExcentosSuccessNotifier with "checkout" command,
  8 |       // which matches against previously recommended products
  9 |
 10 |       // Please call the following function for each product in the shopping cart. Below are some sample calls.
 11 |       // ExcentosSuccessNotifier(command, ProductId, ProductMasterId, ProductLabel, Category, Price per SKU, Quantity, Currency);
 12 |
 13 |       // Example calls:
 14 |       // ExcentosSuccessNotifier("checkout", "236120001", "23612", "Cooles Herren Shirt", "T-Shirt", 19.99, 1, "Euro");
 15 |       // ExcentosSuccessNotifier("checkout", "236120052", "23612", "Fancy Herren Shirt", "T-Shirt", 19.99, 1, "Euro");
 16 |       // ExcentosSuccessNotifier("checkout", "251560008", "25156", "Herren Strick Pullover", "Pullover", 79.98, 2, "Euro");

 17 |		//>>>> please implement a loop function in your Ecommerce system that calls the excentos function for every purchased product. Take this PSEUDO-CODE as an example suggestion
 18 |       //>>>> PRODUCT_LIST = SHOP.CHECKOUT.GET_PRODUCTS()
 19 |       //>>>> FOR EACH PRODUCT IN PRODUCT_LIST:
 20 |       //>>>>     ExcentosSuccessNotifier("checkout", PRODUCT.ID, PRODUCT.VARIANT_ID, PRODUCT.LABEL, PRODUCT.CATEGORY, PRODUCT.PRICE_SKU, PRODUCT.QUANTITY, "Euro");
 21 |
 22 |       // Finally the "track" command will send the data to the excentos Analytics System
 23 |       // together with the Order/Transaction-ID of your Shop-System / Cart-Functionality
 24 |       // ExcentosSuccessNotifier(command, OrderID)
 25 |       // Example call:
 26 |       // ExcentosSuccessNotifier("track", "order123456789");
 27 |
 28 |       //>>>> ORDER_ID = SHOP.CHECKOUT.ORDER_ID
 29 |       //>>>> ExcentosSuccessNotifier("track", ORDER_ID);
 30 |  </script>
Shopify Liquid Template Example
This code example for integrating the excentos Ecommerce tracking into e.g. the Shopify platform shows how your actual code might look like.
Please replace the term projectName with your Workbench account name.1 | <script> 2 | (function(E,x,c,e,n,t,o,s){o="ExcentosSuccessNotifier";E[o]=E[o]||function(){(E[o].q=E[o].q||[]).push(arguments)}; 3 | n=x.createElement(c);t=x.getElementsByTagName(c)[0];n.async=1;n.src=e;t.parentNode.insertBefore(n,t);}) 4 | (window,document,"script","//service.excentos.com/projectName/DE/ajaxclient/xcProject/ExcentosSuccessNotifier.js"); 5 | 6 | {% if first_time_accessed %} 7 | {% for line in checkout.line_items %} 8 | 9 | ExcentosSuccessNotifier("checkout", line.product_id, line.variant_id, line.title, "", line.final_price, line.quantity, "Euro"); 10 | 11 | {% endfor %} 12 | 13 | ExcentosSuccessNotifier("track", checkout.order_id) 14 | 15 | {% endif %} 15 | </script>
-
Diagram of Ecommerce Tracking and Data Flow
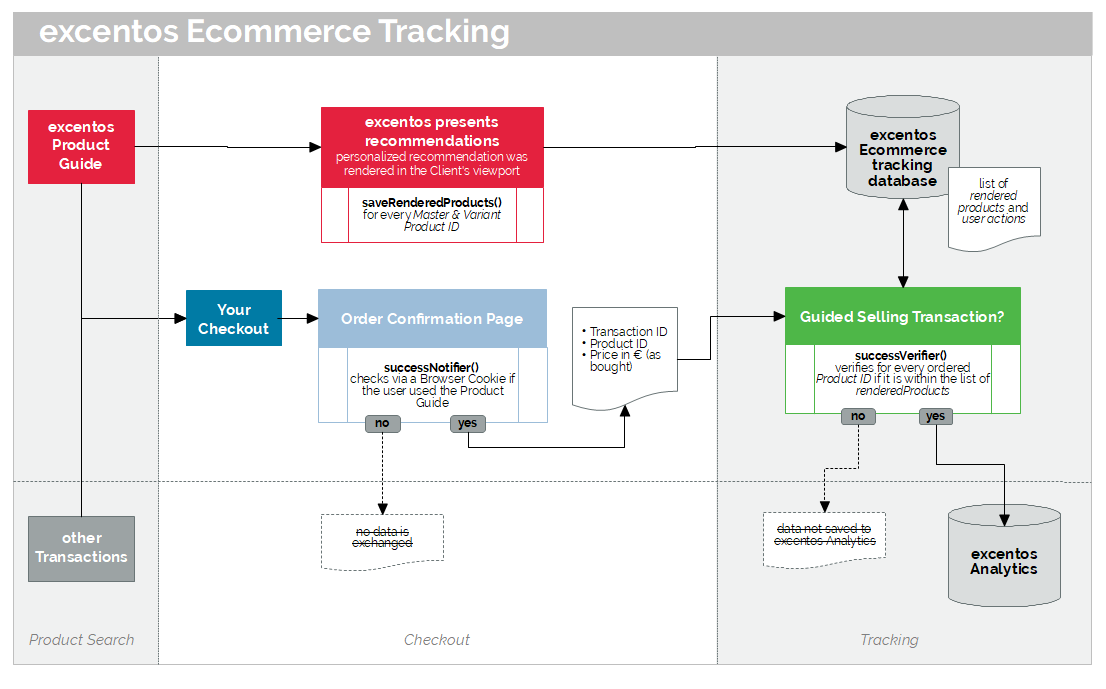
As the image shows, excentos stores information only if required for checking orders caused by excentos.
-
FAQ and further information
How does the successNotifier work?
The successNotifier is activated by your transaction confirmation page. It checks via a cookie whether the user ever used the excentos Product Guide. If not, no further data is exchanged. Only if the user ever used the excentos Product Guide, the successNotifier checks for every product ID of an order, if the product was recommended by excentos (i.e. displayed in the browser's viewport). Only if a product was recommended by excentos, the order data is transmitted to and stored by excentos.
-
How does the successNotifier work?
The successNotifier anonymously checks whether the user ever used the excentos Product Guide.
The successNotifier is activated by your transaction confirmation page. It checks via a cookie whether the user ever used the excentos Product Guide. If not, no further data is exchanged. Only if the user ever used the excentos Product Guide, the successNotifier checks for every product ID of an order, if the product or a product variant was recommended by excentos (i.e. displayed in the browser's viewport). Only if a product was recommended by excentos, the order data is transmitted to and stored by excentos.
-
Does the excentos e-Commerce Tracking affect my website's shopping basket functionality?
No since it is not integrated into the checkout, but only into the order confirmation page
The excentos SuccessNotifier method is activated only in the order confirmation page. Thus, the user already purchased the product. The SuccessNotifier does not interfer with your website's order functionality.
Most websites have integrated tracking pixels and / or affiliate tracking methods in the order confirmation page, that's why excentos also uses it for the SuccessNotifier. -
What is a recommended product? What does rendered in the viewport mean?
Each product that was rendered by the user's web-browser is interpreted as a recommended product
excentos uses Javascript functions to assess whether a product was rendered in the user's web-browser. A product can only be rendered by the web-browser if the user clicked or scrolled through the Product Guide to see the result list. Depending on your project configuration, this in most cases requires answering mandatory questions. Thus, rendered products are individual recommendations actively requested by the user.
-
How can I test which products were recommended by the excentos Product Guide?
You can check the list of recommended products in the excentos backend for each visitor
excentos stores for each visitor which products were recommended to him. Here is how you can access this information:
- get the excentos Visitor ID
- get the excentos Visitor ID for yourselves: if you want to check the list of recommended products for you own excentos Visitor ID after using the excentos Product Guide with your web-browser, you can derive your excentos Visitor ID from the cookie stored in your browser. Open the list of cookies in your web-browser, then filter for the cookies of your website (e.g. www.your-bikeshop.com) and search for the cookie named xcVisitorId. Your excentos Visitor ID is contained in the field content or so of the cookie. An example for the excentos Visitor ID is: 1162205206
- get the excentos Visitor ID for another visitor: If you want to check the recommended products for another Visitor, you first need to identify the user's excentos Visitor ID. Log into the excentos Analytics-system. Go to the report "Visitors | Visitor Log". Select the corresponsing date range or custom segments to identify the user. In the list of visitors, there are 2 options to read the excentos Visitor ID: a) hover over the list item for the Visitor and see the excentos Visitor ID on the right side or b) see the excentos Visitor ID on the left side below the date (please note that in the tooltip in our Analytics-system, the ID is called "User ID" but it denotes the excentos Visitor ID)
- get the list of recommended products for a excentos Visitor ID: login into the excentos Backend. Go to the menu "Start | Administration | Pay-Per-Order" (only available if pay-per-order tracking is enabled for your project). Go to the report "Recommended Products for a Visitor of the Product Guide". Enter the excentos Visitor ID into the search field and hit "Get Recommended Products".
The report shows several dates when this Visitor used the Product Guide, and for each visit lists the Product IDs of your Shop-System that were recommended to this Visitor.
To compare these Product IDs with your Shop-System, most Shop-Systems contain this data in their search and product detail page.
- get the excentos Visitor ID
-
How can I check all events / actions of a user? How can I see the order details for a visitor ID?
You can analyse all activities for every user in the excentos Analytics system
If you want to check the actions a user made or want to see the order details for a user, you need the visitor ID and the excentos Analytics system. Here's how you can access the data:- go to the excentos Analytics system and log in
- open thevisitor log (report: Visitors | Visitor Log)
- determine the visitorID that you want to look for and when (date and time) this visitor used the Product Guide. To determine the date and time of a visitor, you can also use the excentos PPO backend functionality described above
- filter the Piwik visitor log view for the date when the visitorID used the Product Guide
- if the visitor log contains more than 1 page, then go to the page of the visitor log with the corresponding time value
- identify the data set by comparing the visitor ID (numerical value shown in the left column, row 4)
- you can now see all actions and - if applicable - the order the user placed
-
How can I compare an order tracked by excentos with the order data in my Shop?
Compare the order ID that excentos stored for each successful visitor
If you want to compare the orders tracked by excentos with the orders generated and tracked in your Shop / e-Commerce system, use the order ID to compare the information stored in excentos Analytics and your Shop:
- go to the excentos Backend, login and select the view "Start | Administration | Pay-Per-Order"
- go to the report "Ecommerce Orders by Date Range"
- select the corresponding date range and run the report with "Get Ordered Products"
- check the table that contains the order IDs of your Shop
- compare the order ID and order information in the excentos Backend with the order information of your Shop
-
What about product variants?
When users shop for products, they first decide for a basic product and then for a product variant such as e.g. color or size variation. Depending on the product data you provide to excentos and whether the product variant is already selected within the Product Guide or within your product detail pages (which is mostly the case), excentos displays master products or one (or several) selected product variant.
Since in any case excentos helped to convince the user of the (master) product itself - and in many cases the variant is only selected within your Shop / Website - the PPO tracking contains any product variant no matter whether this specific or another product variant was recommended to the user.
-
-
How to test the Ecommerce tracking
Testing the Ecommerce tracking functionality is of course crucial, both for you and for excentos. Here are some tips how to test the Ecommerce tracking functionality - of course the test can only be done once you successfully integrated the Ecommerce tracking code into your order confirmation page:
- make sure that your IP adress is not (yet) configured as part of the blacklist in the excentos Analystics
We typically set all excentos office IP adresses and your office IP adress on the blacklist to exclude your and our traffic from the Analytics data; however in order to test the Ecommerce tracking functionality, traffic from your IP may not be excluded. If you are not sure if your IP adress is already blacklisted, please ask excentos support. Or use a hotspot / tethering via mobile network to make sure the transaction takes place outside of your IP adress range. - use the Product Guide with a browser with cookies enabled (since the Ecommerce tracking functionality uses cookies as described in the documentation)
- run through the Product Guide and go to the result list to make sure you were presented a product recommendation.
You can either click on the product to visit the product detail page; but it is actually also enough to have the product rendered in your browser's viewport - buy that very product with the same browser (no matter if within the same session, or in a later session; but cookies may not have been deleted in between or disabled by this browser)
- log into our analytics system and test in the following views if the transaction was tracked:
- Visitor | Visitor Log (the transactions should be visible right away for the day selected in the Analytics date range when the transaction took place)
- the various Ecommerce reports.
Please note that depending on the report, it can sometimes take up to an hour until the data is processed by the Analytics engine - please notify excentos once you have successfully tested the Ecommerce tracking so that excentos can also run a test
Prerequisites for testing
In order to allow for effective testing, excentos would greatly appreciate if you provide a test shopping cart functionality (as already mentioned in the prerequisites). Please also provide this test shopping cart functionality to excentos so that we can run our own tests. This is crucial since both you and excentos want to use the Ecommerce tracking to assess the business value of the project and perform optimizations of the Product Guide.
- make sure that your IP adress is not (yet) configured as part of the blacklist in the excentos Analystics